Technical Drills
Technical Drills
A library of drills you can run on your own. Use these after the warm-up to get purposeful reps in. Click any drill to expand the full instructions.
Drill 1
Soft First Touch and Opening Up When Receiving
Partner drill for developing a cushioned first touch and proper body shape when receiving passes.
Set-Up
- Two players, 10 to 12 yards apart.
- No cones required. Firm ground passes only.
Stage 1
Driven Pass Receiving
- Player A plays a firm driven pass to Player B.
- Player B cushions the ball with the inside of their foot, absorbing the pace.
- Player B returns the pass in two touches.
- Focus: keep the receiving foot relaxed at contact, do not stab at the ball.
Stage 2
Open Body Receiving on the Back Foot
- Receiver adjusts body angle so they are receiving at a slight angle rather than straight-on, opening their hips to the field.
- Take the first touch on the back foot, slightly away from and ahead of the direction of the pass, then pull back and play the return pass across.
- Before receiving, scan the space behind and beside you.
- Add a pass fake: after the first touch, show a pass in one direction, then switch and play it back across.
Drill 2
Receiving and Opening Up, Turning, Shielding, Letting the Ball Run
Cone drill with three progressive stages covering checking runs, turning away from pressure, and letting the ball run past a defender.
Set-Up
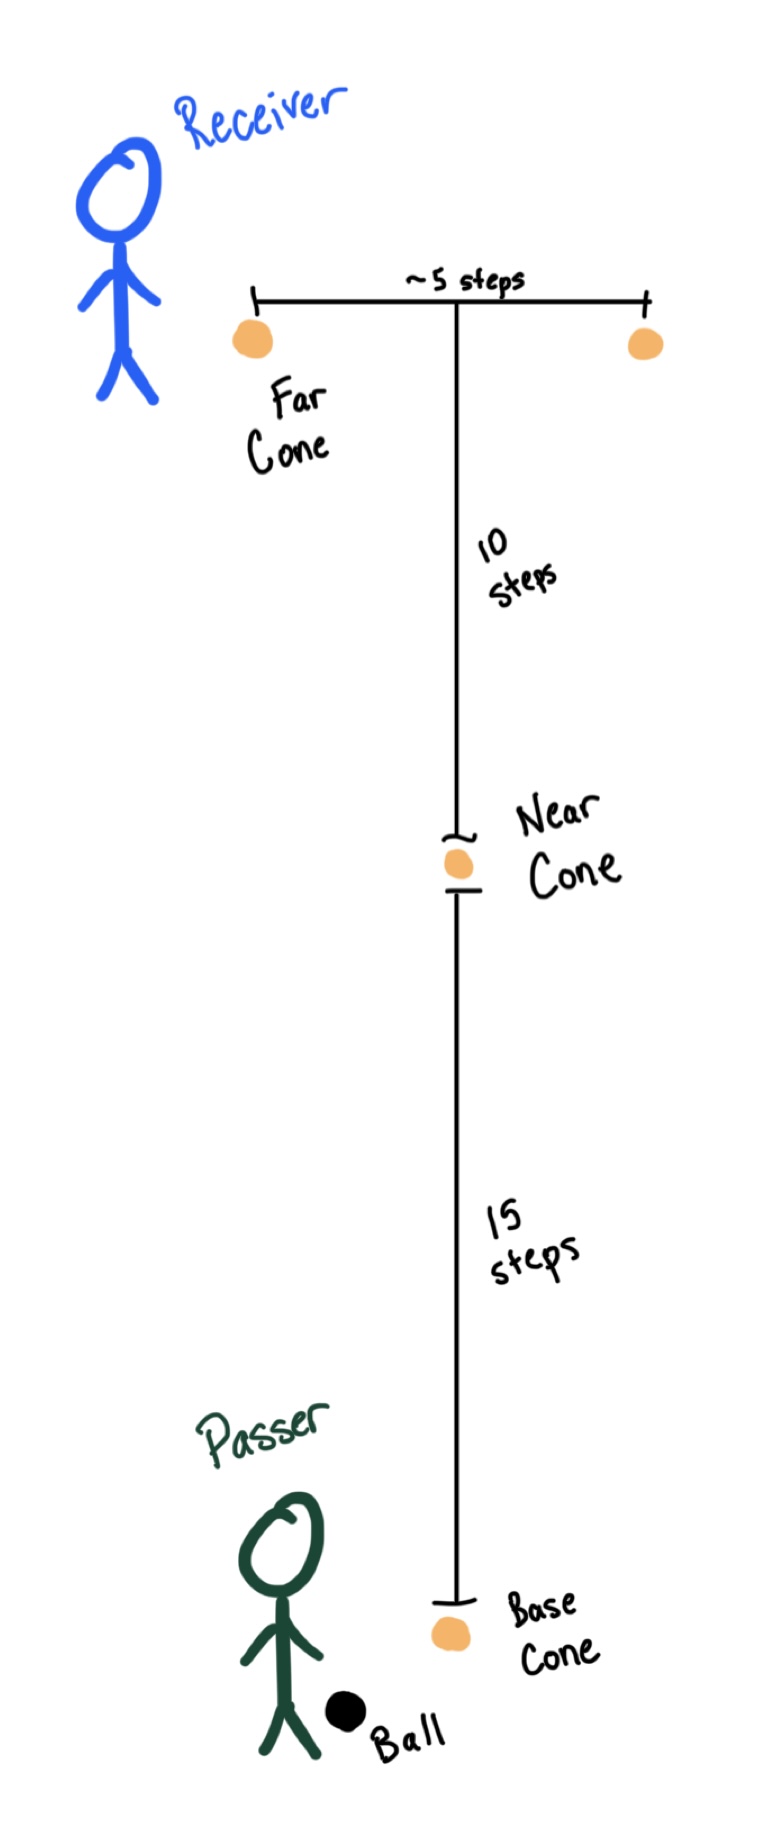
- Place a Base Cone for the passer.
- 15 steps forward from the passer, place the Near Cone.
- 10 steps further forward, place two Far Cones about 5 steps apart horizontally.
- Passer stands at the Base Cone with the ball. Receiver starts at the Far Left Cone.
Stage 1
Check, Receive, Open Up, and Play a Long Ball
- Receiver checks from the Far Left Cone to the Near Cone, running onto the ball as it arrives.
- Receive on the back foot on the left side of the Near Cone, take a soft touch, and play it back with the same foot.
- Open up and swing wide of the Far Cone to create a new angle.
- Passer plays a long ball to the receiver's feet. Receiver takes a big first touch towards and around the Far Left Cone, then plays it back to the passer.
Stage 2
Check Away, Check Back, Turn, and Release
- Receiver starts at the Near Cone and checks away to the Far Left Cone, dragging an imaginary defender with them.
- Receiver then checks back hard to the Near Cone to lose the defender.
- Receive the ball and take the first touch away from pressure, turning to face away from the imaginary defender.
- Open up and play a pass to the passer, who has made a run wide of the Far Cone.
Stage 3
Check, Shield, and Let the Ball Run
- Receiver checks from the Far Left Cone to the Near Cone. Assume an imaginary defender is overplaying the right side.
- As soon as the receiver starts checking, the passer plays a medium-weight pass to the left of the passer, curving to the receiver's right foot.
- Rather than taking a normal touch, the receiver shields the imaginary defender and lets the ball run past them.
- Change direction quickly to chase the ball. Stay low and on the toes through the direction change.